在Xilinx Vivado and Vitis上建立闪存启动映像(flash boot image) 以 ZCU102 为例 |
您所在的位置:网站首页 › 打开flash image tool报错 › 在Xilinx Vivado and Vitis上建立闪存启动映像(flash boot image) 以 ZCU102 为例 |
在Xilinx Vivado and Vitis上建立闪存启动映像(flash boot image) 以 ZCU102 为例
|
目录 设置Setup 添加启动分区Add boot partitions 烧录Program boot image on ZCU102 board 启动Start FPGA from flash image 参考资料Reference 在创建Xilinx FPGA zcu102闪存启动映像后整理的资料,为无OS设计, 在此分享 测试环境 : Vivado 2019.2 Vitis 2019.2 Zynq UltraScale+ MPSoC ZCU102 Evaluation Kit 设置SetupIf you have hw bitstream and sw application, and did not want to use the linux or any OS, please follow the steps to create boot image. 1. Start the Vitis IDE (19.2) and set the workspace 2. Select Xilinx > Create Boot Image
3.Select Zynq MP as Architecture 4.Select the Create new BIF file option 5.Ensure that the Output format is set to BIN 6.In the Basic tab, browse to and select the Output BIF file path and Output path
1. Click Add to open the Add Partition dialog box.
2. In the Add Partition dialog box, click the Browse button to select the FSBL executable. a. For FSBL, ensure that the Partition type is selected as bootloader and the correct destination CPU is selected by the tool. The tool is configured to make this selection based on the FSBL executable. b. Ignore the Exception Level, as FSBL is set to EL3 by default. Also, leave the Trustzone setting unselected for this example. c. Click OK to select the FSBL and go back to the Create Boot Image wizard.
3. Click Add to open the Add Partition window to add the next partition. 4. The next partition is the bitstream a. For BitStream, ensure that the Partition type is selected as datafile and Destination device is selected as PL. b. Click OK to select the bitstream and go back to the Create Boot Image wizard.
5. Click Add to open the Add Partition window to add the next partition. 6. The next partition is the sw application which works after power-up. a. For BitStream, ensure that the Partition type is selected as datafile, select Destination device as PS, Destination CPU as A53 0, Exception level as EL2, and Enable Trust Zone. b. Click OK to select the bitstream and go back to the Create Boot Image wizard.
7. Click the Create Image
1. In the Vitis IDE, select Xilinx > Program Flash.
2. In the Program Flash wizard, browse to and select the ***.bin image file.
3. Select qspi-x8-dual_parallel as the Flash type. 4. Set the Offset as 0 and select the FSBL ELF file ( ../(project name)/hw_description/export/hw_description/sw/hw_description/boot/fsbl.elf).
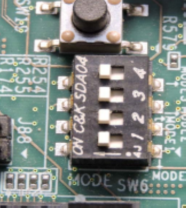
5. Ensure that a USB cable is connected between the USB-JTAG connector on ZCU102 target and the USB port on the Host machine using the following steps. a. Ensure the board power off. b. Set the SW6 Boot mode switch as shown in the following figure (1111). c. Turn on the board.
6. Click Program to start the process of programming the QSPI Flash with the image. Wait until you see the message “Flash Operation Successful” in the console.
1. Ensure the board power off. 2. Configure the Board to Boot in QSPI-Boot mode by switching SW6 as shown in following figure(1011). 3. Turn on the board.
|


【本文地址】
今日新闻 |
推荐新闻 |